CommandBuffer
应用一、 屏幕截图
CommandBuffer buf = new CommandBuffer();
buf.name = "Grab Screen Texture";

// 名称任意起
screenCopyID = Shader.PropertyToID("_ScreenCopyTexture");

// 创建临时 RT。
// 像素宽度,或为 -1,表示“摄像机像素宽度”。
// 像素高度,或为 -1,表示“摄像机像素高度”。
buf.GetTemporaryRT(screenCopyID, -1, -1, 0, FilterMode.Bilinear);

// 复制当前屏幕到 RT
buf.Blit(BuiltinRenderTextureType.CurrentActive, screenCopyID);

// 如何使用这个 rt, 这里测试,赋值给Shader 贴图。
//buf.SetGlobalTexture("_CustomMainTex", screenCopyID);

m_camera.AddCommandBuffer(_cameraEvent, buf);
接下来使用 RawImage 作为输出实验。
Shader 1
Shader "Unlit/GrabScreenTexture"
{
    SubShader
    {
        Tags { "RenderType"="Overlay" }
        LOD 100

        Pass
        {
            CGPROGRAM
            #pragma vertex vert
            #pragma fragment frag
            // make fog work
            #pragma multi_compile_fog

            #include "UnityCG.cginc"

            struct appdata
            {
                float4 vertex : POSITION;
                float2 uvgrab : TEXCOORD0;
            };

            struct v2f
            {
                float2 uvgrab : TEXCOORD0;
                UNITY_FOG_COORDS(1)
                float4 vertex : SV_POSITION;
            };

            // 1. 作为普通图使用
            sampler2D _CustomMainTex;
            float4 _CustomMainTex_ST;

            v2f vert (appdata v)
            {
                v2f o;
                o.vertex = UnityObjectToClipPos(v.vertex);
                //o.uvgrab = TRANSFORM_TEX(v.uvgrab, _CustomMainTex);
                o.uvgrab = v.uvgrab.xy *  _CustomMainTex_ST.xy + _CustomMainTex_ST.zw;
                UNITY_TRANSFER_FOG(o,o.vertex);
                return o;
            }

            fixed4 frag (v2f i) : SV_Target
            {
                // sample the texture
                fixed4 col = tex2D(_CustomMainTex, i.uvgrab);
                // apply fog
                UNITY_APPLY_FOG(i.fogCoord, col);
                return col;
            }
            ENDCG
        }
    }
}
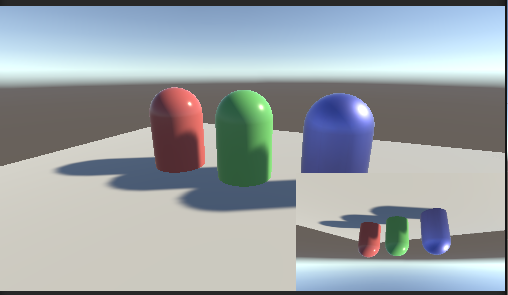
作为普通图使用,这样出来的效果: 1. 图像为全屏图 2. Dx和 OpenGL 坐标没有适应, 导致颠倒图。
Shader 2
Shader "Unlit/GrabScreenTextureFinal"
{
    // 调试作用
    Properties{
        _Color("Color", Color) = (1, 1, 1, 1)
        _OffetX("OffetX", Range(-0.5, 0.5)) = 0
    }

    SubShader
    {
        Tags { "RenderType" = "Overlay" }
        LOD 100

        Pass
        {
            CGPROGRAM
            #pragma vertex vert
            #pragma fragment frag
            // make fog work
            #pragma multi_compile_fog

            #include "UnityCG.cginc"

            struct appdata
            {
                float4 vertex : POSITION;
                float2 texcoord: TEXCOORD0;
            };

            struct v2f
            {
                float4 vertex : SV_POSITION;
                float4 uvgrab : TEXCOORD0;
                UNITY_FOG_COORDS(1)
            };

            half _OffetX;
            v2f vert(appdata v)
            {
                v2f o;
                o.vertex = UnityObjectToClipPos(v.vertex);

                //1。 OpenGL /DX 坐标适应
#if UNITY_UV_STARTS_AT_TOP
                float scale = -1.0;
#else
                float scale = 1.0;
#endif
                //2. 齐次坐标 转换为 屏幕坐标
                // 齐次坐标,原点在中间, (-w, w)
                // 屏幕坐标, 原点左下角(统一OpenGL系)
                o.uvgrab.xy = (float2(o.vertex.x, o.vertex.y*scale) + o.vertex.w) * 0.5;
                o.uvgrab.zw = o.vertex.zw;

                // 添加调试  _OffetX
                o.uvgrab.x = o.uvgrab.x+ _OffetX;
                UNITY_TRANSFER_FOG(o,o.vertex);
                return o;
            }

            sampler2D _CustomMainTex;
            float4 _CustomMainTex_TexelSize;
            half4 _Color;
            fixed4 frag(v2f i) : SV_Target
            {

                // 屏幕比例, 转换为图像比例, 把这个比例作为 uv采样。
                i.uvgrab.xy = _CustomMainTex_TexelSize.xy * i.uvgrab.z + i.uvgrab.xy;

                // sample the texture
                // 添加调试  _Color
                half4 col = tex2Dproj(_CustomMainTex, UNITY_PROJ_COORD(i.uvgrab)) * _Color;
                UNITY_APPLY_FOG(i.fogCoord, col);
                col.a = 1.0;
                return col;
            }
            ENDCG
        }
    }
}

修正后: 1. 图像为渲染物体区域图 2. Dx和 OpenGL 坐标适应。
从效果上看到和没有渲染一样,那是因为一模一样的完全重合。 调整 OffsetX 和Color 就能看到了。
关于坐标徐转换